
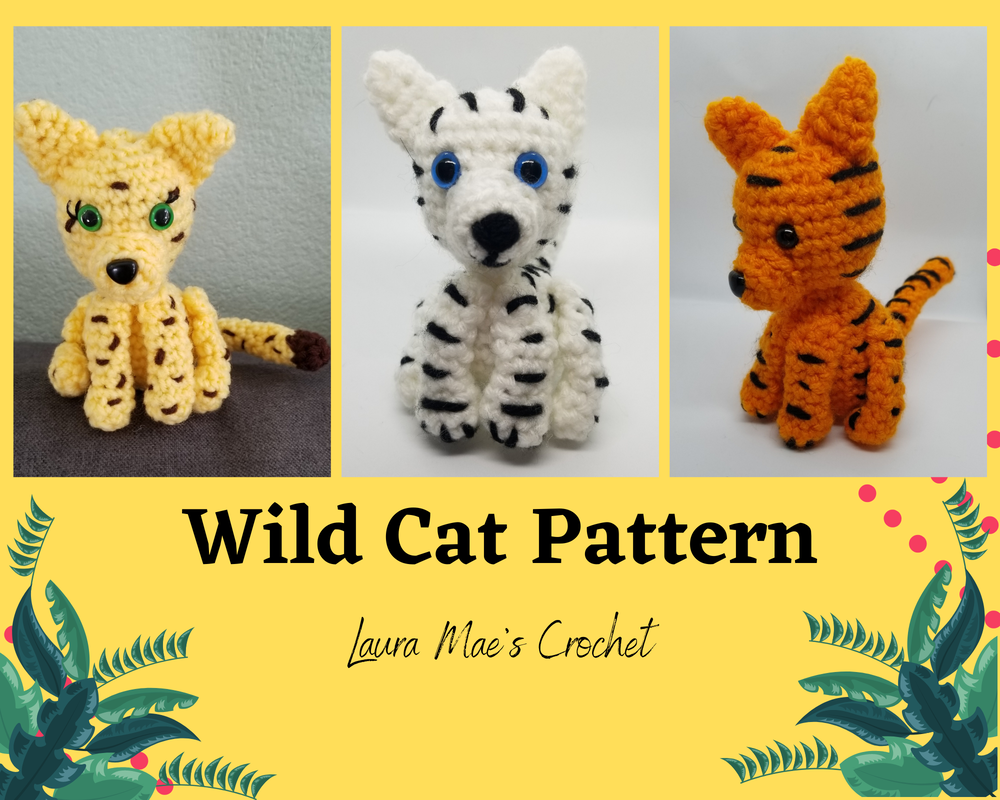
 Click here for Ravelry Listing. Notes: For Cheetah, make body/head/limbs/tail in yellow. Use brown and short stitches to make spots For Tiger, use orange for body/head/limbs/tail, then sew long stitches in black for stripes For White Tiger, use white for body/head/limbs/tail, then sew long stitches in black for stripes For Panther, use all black For Snow Leopard, use white for body/head/limbs/tail, then sew short stitches in brown for spots For Cougar/Mountain Lion, use all light brown, except for the ears – use dark brown for R1-2 of ears, then switch back to light brown What you’ll need:
Stitches/Abbreviations Used: Single Crochet (sc) Increase (inc) Decrease (dec) Back Loop Only (blo) Front Loop Only (flo) Fasten off (f/o) Pattern: Body: R1: 6 sc R2: inc in each st around (12) R3: *Inc, sc, rpt from * around (18) R4: *inc, sc 2, rpt from * around (24) R5-9: sc around (24) R10: *dec, sc 4, rpt from * around (20) R11: sc 5, dec, sc, dec, sc 10 (18) R12: sc around (18) R13: *dec, sc, rpt from * around (12) Stuff R14: dec around (6) Don’t fasten off. Continue to head.  Need the perfect yarn bag? Check out the Deluxe Double Duty Caddy! Head: R15: flo inc around (12) R16: *sc, inc, rpt from * around (18) R17: *sc 2, inc, rpt from * around (24) R18-23: sc around (24) R24: *dec, sc 2, rpt from * around (18) Attach safety eyes, between R20-21, about 3 stitches visible between, making sure “hump” is in the back; stuff R25: *dec, sc, rpt from * around (12) R26: dec around (6) f/o leaving tail to close up. Weave tail through last remaining stitches, pull tight, then weave in tail Front Legs: R1: 6 sc in mc R2: *inc, sc, rpt from * around (9) R3: sc around (9) R4: *dec, sc, rpt from * around (6) R5-9: sc around (6) f/o leaving tail to sew to body  The Tiny Utility Tote is perfect for a project bag! Back legs: R1: 6 sc in mc R2: *inc, sc, rpt from * around (9) R3: sc around (9) R4: *dec, sc, rpt from * around (6) R5: sc around(6) R6: inc, inc, dec, dec (6) R7: sc around (6) R8: dec, dec, inc, inc (6) R9: sc around (6) R10: inc around (12) f/o leaving long tail for sewing Muzzle: R1: 6 sc in mc R2: inc around (12) R3: sc blo around (12) f/o leaving long tail for sewing Embroider on nose (or use safety nose) and mouth (if desired) Ears: R1: 4 sc in mc (4) R2: inc, sc (2x) (6) R3: sc around (6) R4: *inc, sc 2, rpt from *once (8) R5: *inc, sc 3, rpt from * once (10) f/o leaving long tail for sewing Tail: R1: 6 sc in mc R2-15: sc around f/o leaving long tail for sewing 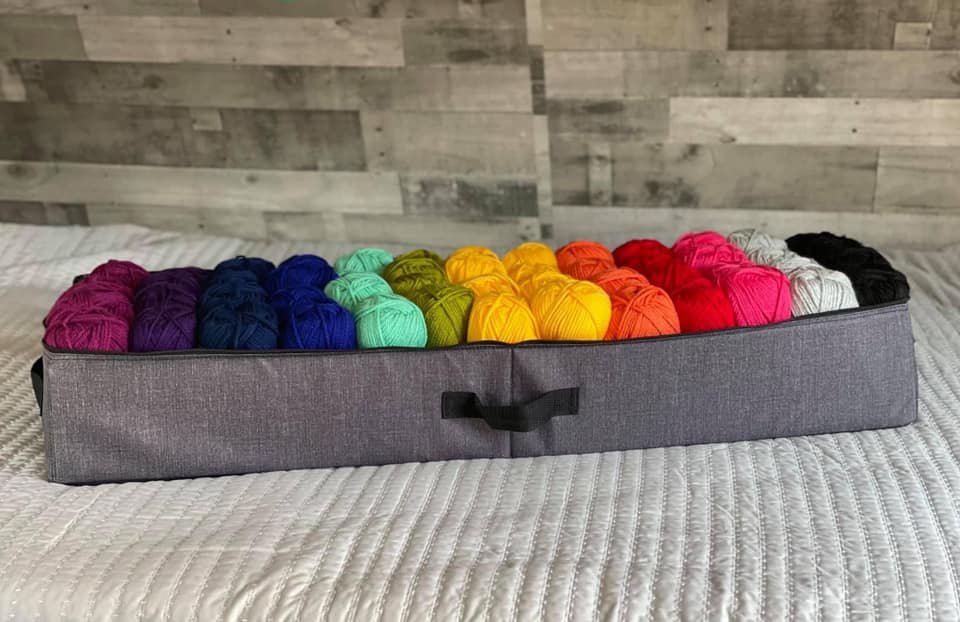 Store your yarn in the perfect bin to tuck right under your bed! Assembly:
Sew ears about 4 stitches behind eyes, across R21-25 Sew front paws in front, centered and next to each other, around R13-14 Sew back legs on sides across approx. R4/5 to R10/11 about 2 stitches visible between front and back leg (see photo A for perspective). Make sure “knee” is pointed forward; it should be close to front legs. Place a stitch or two to secure “knee” if desired. Sew tail around R5-7 centered in back between back legs Stripes: Sew stripes along stitch lines, about 2 rows apart. Don’t go across more than about 6 stitches, or it loses its shape a bit. Spots: Sew spots across about one stitch, randomly around body, legs, tail and head. Leave belly spotless. Finishing: Sew “claw” lines on paws if desired Weave in and trim all ends.
0 Comments
 R1: 6 sc in mc R2: inc around(12) R3: *inc, sc, rpt from * around (18) R4: *inc, sc 2, rpt from * around (24) R5: sc around (24) Change to Orange R6: *inc, sc 3, rpt from * around (30) R7: sc around (30) Change to Yellow: R8-9: sc around (30) Change to green R10-11: sc around (30) Change to Blue R12: *dec, sc 3, rpt from * around (24) Place safety eyes between R7-8 about 5 stitches apart R13: *dec, sc 2, rpt from * around (18) Begin stuffing head R14: *dec, sc, rpt from * around (12) Change to purple R15: sc around (12) Finish stuffing head R16: *inc, sc, rpt from * around (18) Change to Red R17: *inc, sc 2, rpt from * around (24) R18: sc around Change to orange: R19-20:sc around (24) Change to Yellow: R21-22: sc around (24) Change to Green R23-24: sc around (24) Begin stuffing body Change to Blue Split for legs R19A: sc 12 continue across (see photo for reference). Make sure the split is in the middle, lined up between the eyes. Continue a couple extra stitches, or lessen the original sc in order to keep the split in the middle, and an even number of sc on either side. Then continue across and continue as normal. R20-21A: sc around (12) Change to Purple R22-24A: sc around (12) Stuff leg R25A: dec around (6) Finish off, leaving a tail to sew up the last stitches. Weave through remaining 6 stitches, pull tight, weave in end. In Blue R19B: Rejoin, leaving long tail to sew together legs, and sc around (12) R20B-21B: sc around Change to Purple: R22-24B: sc around (12) Stuff leg. This is also your last chance to stuff the body, so be sure it’s to your liking. R25B: dec around (6) Finish off, leaving a tail to sew up the last stitches. Weave through remaining 6 stitches, pull tight, weave in end. Arms: (Make 2) In orange: R1: 6 sc in mc R2: *sc, inc, rpt from * around (9) Change to Red: R3-4: sc around (9) R5-6: sc around (9) Change to purple Fasten off, leaving long tail to sew to body. Do not stuff. Assembly Sew arms to sides, lining up the correct colors. Weave in all ends. Need Yarn Storage?Check out Thirty-One's awesome Tuck-Away Tote! This holds 52 skeins of yarn, and can store neatly under your bed, your couch, closet, or anywhere you need to store yarn! Check it out here: https://www.mythirtyone.com/us/en/11164174?pd=12090336 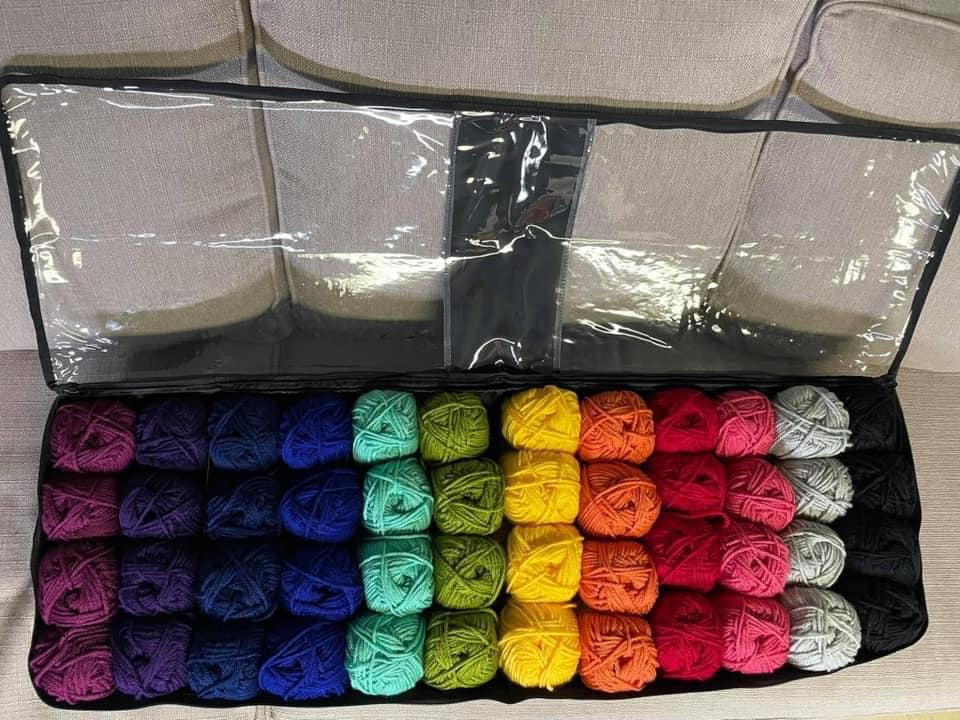 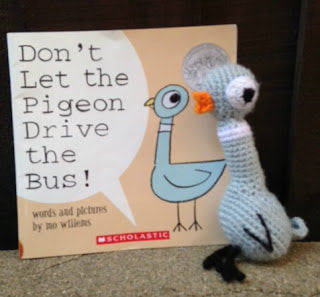 My boys LOVE the Pigeon books and we love reading together. One day while we were reading, my oldest asked for a stuffed pigeon. It took a bit of working, but I finally came up with one that I was happy with. And even better, he loved it! My second son asked for one and off I went to make another... and to write the pattern! So now I'll share it with you! You can also find it on Ravelry here if you'd like to add it to your library. What you'll need: Worsted Weight yarn (light blue with small amounts of black and white) G hook tapestry needle for sewing in ends Stitches Used: Magic Circle (MC) Single Crochet (sc) Slip Stitch (sl st) Chain (ch) Decrease stitch (sc2tog) Back Loop Only (blo) Half double crochet (hdc) Pattern: Body: (Starting with light blue) R1: 6 sc in mc R2: 2 sc in each st (12) R3: **2sc in next st, sc in next** rpt around (18) R4: **2sc in next st, sc in next 2** rpt around (24) R5: **2sc in next st, sc in next 3** rpt around (30) R6: **2sc in next 3 st, sc next 12** rpt once more (36) R7-10: sc in each st around (36) (Make sure you note the beginning of next round with a stitch marker or equivalent) R11: ch 5, sk 5, blo sc around (31 st + ch 5) (continue on treating the ch stitches as normal stitches) R12: **sc2tog, sc next 4** rpt around (30) R13: **sc2tog, sc next 3** rpt around (24) R14: **sc2tog, sc next 2** rpt around (18) R15: **sc2tog, sc next st** rpt around (12) This is a good time to stuff the body R16: sc2tog around (6) f/o leaving a long tail. Weave tail through last 6 stitches and pull tight. Weave in end. Tail: From stitch marker that you placed in R11, count back 16 st, rejoin yarn. R1: sc in same st as join and in next 3 stitches R2: ch 1, turn, sc across (4) R3: sc2tog twice (2) R4: sc across (2) R5: sc2tog f/o and weave in end Neck: Rejoin blue yarn at stitch marker (you should have 10 stitches in next space to work with) R1: sc in same st as join, sc2tog twice, sc next 2 stitch, 2sc in next 2 st, sc last st (10) R2-9: sc around (10) (Start stuffing and continue to stuff as you go) Change to white R10-11: sc around (10) Change to blue R12-13: sc around (10) f/o leaving long tail for sewing on head Head: R1: 6 sc in mc R2: 2 sc in each st (12) R3: **2sc in next st, sc in next** rpt around (18) R4: **2sc in next st, sc in next 2** rpt around (24) R5-9: sc around (24) R10: **sc2tog, sc next 2** rpt around (18) R11: **sc2tog, sc next st** rpt around (12) This is a good time to stuff R12: sc2tog around (6) f/o leaving long tail. Weave tail through last few stitches, pull tight. Weave in end. Eyes: (Make 2) Starting with black R1: 5 sc in mc Change to white R2: 2 sc in each st around (10) R3: sc in next st, **2hdc in next, hdc next** twice, sc next st, sl st (you will be leaving st in round unworked) f/o, leaving a long tail for sewing Legs: (Make 2) With black Ch 11, sl st in 2nd ch from hook and next 2. Ch 4 (this creates other “toe”), sl st in 2nd ch from hook and next 2. Sl st back up the remaining 7 stitches of the leg Beak: With orange R1: Ch 4 R2-4: ch 1, turn, sc across f/o leaving a long tail for sewing Assembly: Sew eyes on head. Make sure they are evenly spaced and eyes are “looking back.” Sew beak in between eyes. Sew head onto body. Sew legs on 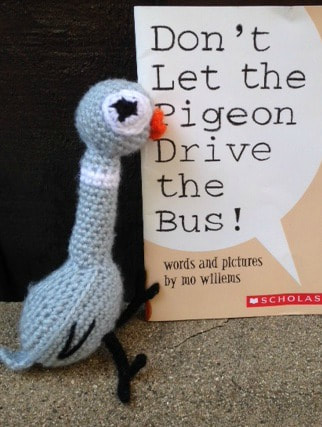 |
Archives
October 2021
Categories |
 RSS Feed
